|
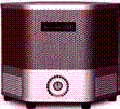
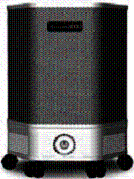
Portable Air Filtration Systems
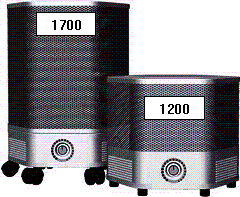
Instruction Manual Models 1200 & 1700Read and keep this manual for reference purposes
Thank you for purchasing a BelKraft portable air filtration system. With proper care and maintenance, your BelKraft Air system will provide many years of reliable service, improving the quality of your air.
INSTALLATION 1. Place the unit in the area where you want the cleanest air. 2. Plug the unit into a grounded outlet. The cord has either a 110V or a 220V plug depending on the area the in which the unit was sold. 3. Turn the unit on by rotating the control dial until you hear or feel it click. The unit will start on the HIGH position. To reduce the airflow, continue to rotate the control dial clockwise. 4. To turn the unit off, rotate the control dial counter-clockwise passed the HIGH position until you hear or feel the click.
CAUTION 1. Make sure the cord is not in the path of people walking or where anything can be rolled over it. 2. Do not place any objects on top of the unit or allow anyone to sit on it. 3. NEVER place any liquids or plants on the unit. Moisture could leak into the unit and damage the filter media or electrical components. 4. The air filtration system discharges the cleaned air through the vents near the bottom on four of the six sides. On HIGH the velocity of the air coming out is high to enhance circulation throughout the area being cleaned. If the airflow is bothersome or creates a draft, turn the unit until the air is directed toward an unoccupied area of the room. NOTE: You may notice a slight new smell from the unit when your first turn it on. This normal and harmless and will dissipate within a few days.
THREE-STAGE FILTRATION
STAGE 1: Prefilter Removes large particulates and odors. Extends the life of the HEPA filter. STAGE 2: HEPA filter 99.97% efficient @ 0.3 microns. Removes dust, pollen, bacteria, animal dander, attached viruses, cigarette smoke, radon daughters and more. STAGE 3: V.O.C. filter Removes odors and hazardous chemicals that may off-gas from cleaners, paints, solvents, carpets, furniture and other items containing synthetic materials. OPTIONAL V.O.C. CARTRIDGE FOR HEAVY-DUTY REMOVAL OF GASES AND ODORS
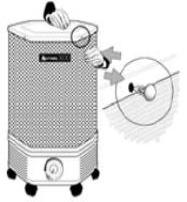
FILTER REPLACEMENT INSTRUCTIONS Opening the cabinet1. Turn the unit off and unplug it. 2. Remove the child-proof access screw at the back near the top of the unit. Do not discard it, as you will need it later. 3. To remove the four buttons located around the top edge, press down on the top cover. At the same time, press against the perforated screen directly below a button. The button will pop out slightly. Pull the button out all the way. Repeat for all four buttons. Once all four buttons are out, remove the metal cover.
Pre-filter1. Lift the complete filter cartridge assembly from the unit. Remove and discard the carbon pre-filter. 2.Wrap the new pre-filter around the HEPA cartridge completely enclosing it. Peel off the adhesive strip backing and press the filter together to seal it. 3. Put the filter cartridge back in the unit.
HEPA filter1. Remove and carefully discard the old HEPA cartridge. 2. Insert a new HEPA cartridge, complete with new Pre-filter and Inner Blanket. 3. Place a new O-ring seal in the outer groove in the top of the HEPA cartridge. If the O-ring appears too big, pinch it in several places until it fits in the groove. Inner Blanket1. Fold the ends of the old Inner Blanket in and remove it from the unit. 2. Insert the new Inner Blanket inside the HEPA filter with the edges overlapped by at least one inch. Once it is in position press the Inner Blanket tightly against the inner screen until the ends butt together.
V.O.C. Cartridge (OPTIONAL) The V.O.C. Cartridge is used in place of the Inner Blanket. • Carefully slide the V.O.C. Cartridge into the HEPA filter. Do not drop it as it is heavy and may damage the unit.
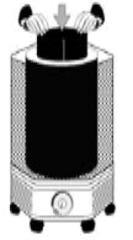
Closing the cabinet 1. Position the top cover on the unit with the child-proof access screw hole at the rear of the unit. 2. Replace the buttons by applying firm pressure to the top cover to align the holes and insert the buttons. 3. Replace the child-proof access screw. Plug the unit in and turn it on. HEPA Filter Replacement As the HEPA filter captures particulates, it will darken over time. Replace the HEPA filter when it darkens to example D. A. New B. Used C. Used D. Replace
ABOUT FILTERS AND SERVICE LIFEThe life spans of the individual filters are: STAGE 1 PREFILTER: 3 to 6 months STAGE 2 HEPA FILTER: 2 to 5 years STAGE 3 INNER BLANKET: 6 to 12 months V.O.C. CARTRIDGE: 6 to 12 months (optional) The useful service life of the filters is directly related to the volume of air passed through the system and the amount of contaminants in the air. If your indoor air contains abnormally high levels of airborne contaminants (such as cigarette smoke) the life of the filters may be shortened. The HEPA filter's particulate removal efficiency actually improves with use as it loads up with particulates. However, as it loads up it also becomes more difficult to move air through the system. If you notice a significant drop in air flow from the unit, inspect the HEPA filter. If the filter media is darkened on the outer side, the HEPA filter should be replaced. Specifications (all models)
CLASSIFICATION Portable HEPA (High Efficiency Particulate Air) 100% Sealed Air Cleaning Device C.S.A. approved MATERIALS: 24 gauge cold rolled steel FINISH: Powder coated baked enamel COLORS : Black, White or Sandstone INTAKE (Upper Section) Perforated steel enclosure surrounding a three-stage filter assembly. OUTFLOW (Lower Section) Encloses motor/fan. MOTOR/FAN Thermally protected Class B insulated motor Designed for continuous operation Run tested for 50,000 hours Service: 120 Volt, 60 Hz. CONTROL: Variable speed Model 1200 DIMENSIONS: 16" W 13.5H WEIGHT : 15 lbs. AIR FLOW (C.F.M.) : 50-175 POWER USAGE: 41-84 Watts
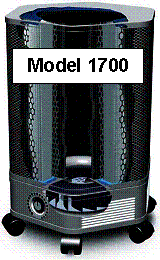
Model 1700DIMENSIONS: 16" W 23H WEIGHT: 22 lbs. AIR FLOW (C.F.M.) : 50-225 POWER USAGE: 41-84 Watts
LIMITED WARRANTY The motor/fan in this BelKraft product is warranted by BelKraft Corporation to the original retail purchaser for FIVE (5) YEARS from the date of purchase. All other components (except filters) are warranted for ONE (1) YEAR. BelKraft will repair or replace at its option the component(s) which upon inspection by an authorized BelKraft dealer proves to have failed in normal use, due to defects in material or workmanship, or, at its option, to replace the unit. Operations other than those recommended in this manual or at voltages other than that specified on the unit, or any attempts by unauthorized personnel to service or modify the unit will void the warranty. WARRANTY SERVICE IS AVAILABLE BY BRINGING YOUR UNIT, OR SENDING IT POSTAGE PREPAID, WITH PROOF OF PURCHASE TO THE VENDOR WHO SOLD YOU THE UNIT. BELKRAFT CORPORATION 634 Chenier Way, Ottawa Ontario K4A 1R4BelKraft Corporation reserves the right to change or modify any specifications without notice. Printed in Canada 05/2008 Visit our website at: www.belkraft.com |

All Rights Reserved