INSTALLATION OF THE UNDERCOUNTER
WATER PURIFIER FILTER HOUSING
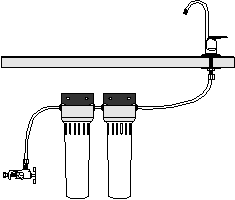
For one to three stage systems, select a suitable location for the filter housing(s) under the kitchen sink or on the under sink doors. The doors can be an advantage for persons who have trouble bending or reaching. Remember this unit must be serviced at regular intervals. Therefore the system should be reasonably accessible to enable the sump to be unscrewed to change or clean the cartridge(s). A clearance of 10 inches is desirable for ease of removal.
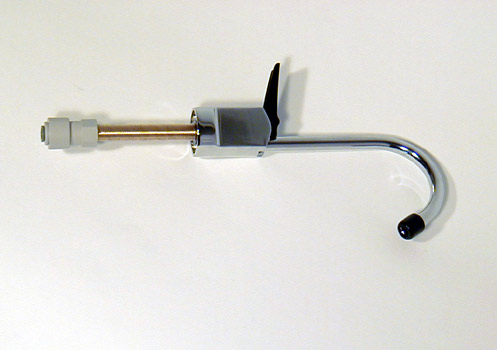
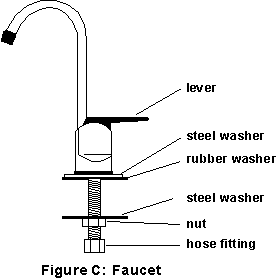
Installing the Ledge Faucet
After a hole is established in the sink or countertop, install the faucet as follows:
Many faucets come with a 3/8" plastic tube inserted into the hole where the faucet spout will go. Its purpose is to protect the handle and hold it in place during shipping. Leave the tubing in the hole while installing the faucet on the sink.
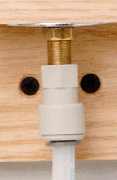
Begin by inserting the metal base plate, then the larger black washer onto the faucet stem. Then insert the faucet stem into the hole on the sink and position it as desired. There are no laws about which way the faucet body is positioned. It's your faucet, so point it the way you want it. Remember that with O-Ring spouts the spout will swivel a full 360 degrees. When we install, we usually mount the handle facing the side rather than the front or back so that it's easy to reach.
 |
These go on bottom of the sink.
(Left to right: D, C, B, A) |
These go on top of the sink. |
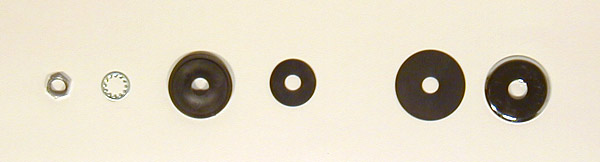
Next, from the underside of the sink, thread the following parts onto the stem in the following order:
A. The smaller flexible black washer. If the hole in your sink is larger than the washer, simply throw the washer away. It isn't necessary.
B. The rigid plastic locating washer. Note that one side is beveled. The purpose of the beveled edge is to locate the washer and hold it in place on thick sinks with a 1.5" hole. If the hole is smaller than 1.5", or if the sink is stainless steel or any other similarly thin material, turn the non-beveled side of the washer up so that it contacts the sink.
C. The star washer, also called a lock washer. There is no up or down.
D. The stem nut.
Tighten the stem nut with a 7/16" open end wrench to secure the faucet in place. NOTE: Unless you have very long arms, this is a two-person job: one person holds the faucet in place, while the other tightens the stem nut. (or put a vice grip wrench loosely on the faucet. The main faucet or wall will hold it in place)
Finish the installation with one of the following options.
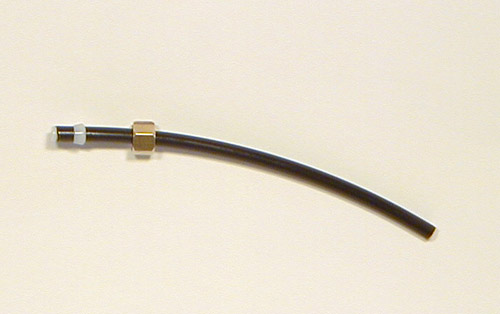
If you have a John Guest faucet adapter, simple screw it onto the faucet stem (Teflon tape may be beneficial) and insert the 1/4" supply tube from your drinking water unit until you feel it hit bottom. The tube should be squarely cut.
If your faucet uses the standard compression fitting, attach tube as follows:
Back the compression nut onto the tube to be attached.
Back the plastic or metal compression olive that comes with the kit onto the tube.
Tighten the nut onto the end of the faucet spout. Get it snug, but don't over tighten.
(Optional) Fit the head of the filter housing to the bracket using the 3 self-tapping screws provided (Fig A.). Ensure the bracket corresponds to the arrow on the head, indicating the direction of water flow.
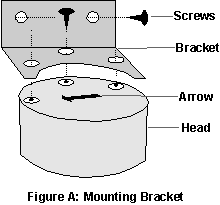
Secure the bracket to the wall or door with the two screws provided. For multi-stage units the short hose inter-connecting the head assemblies should be installed before the heads are mounted to the wall. It is not necessary to mount the filter. You can stand it upright into any area under the sink.
There are a few different connectors to hook up your purifier to the water line.
SADDLE VALVE
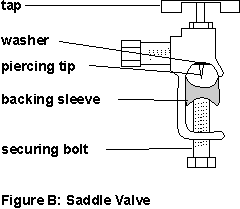
SHUT OFF THE WATER SUPPLY TO THE SINK.
Select a suitable position for the location of the line piercing saddle valve on the copper (or plastic) COLD water line leading to the main faucet.
Ensure that the saddle valve is located ABOVE the sink shut-off valve (if you have one). It must also be accessible enough to allow for isolation of the filter during cleaning or replacement of the cartridge(s).
Back off the tap FULLY to retract the piercing tip into the washer.
Back off the securing bolt and remove the pipe backing sleeve.
Match the curvature of the sleeve to the size of your main water line.
Slide the valve around the line and tighten the securing bolt until it butts up firmly against the sleeve. Do not tighten to the point of crushing the line.
Turn the tap in until you feel the piercing tip contact the water line.
Turn the tap in and out in increasing amounts until you feel the tap turn freely inward.
It has then penetrated the line fully. Continue turning in until it bottoms out. Leave the tap turned fully in. This is the "off" position.
T-connector for flex hose
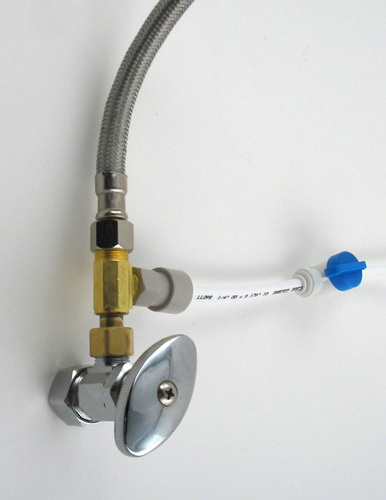 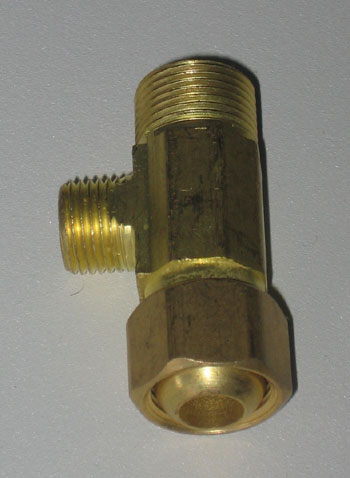 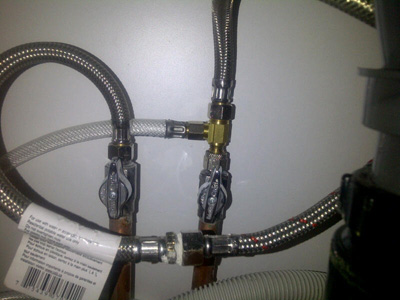 This connector is if you have a regular Flex Hose going from your copper pipe to the cold water faucet. This connector is if you have a regular Flex Hose going from your copper pipe to the cold water faucet.
Shut Off Connector
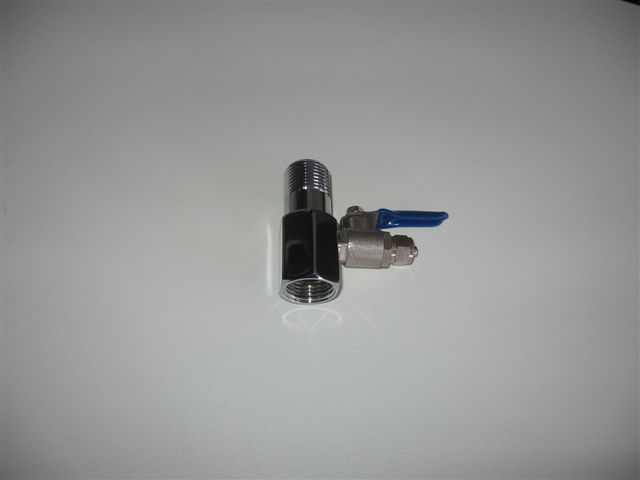
This connector could attach directly to the bottom of the cold water faucet if a flex hose is attached to it. Can not be used with a John Guest "Push Fit " connector.
HOSE CONNECTIONS TO FAUCET OR WATER
John Guest "Push Fit" hose/tube connections can be supplied with the faucet, saddle valve and ball valve shut-off for ease of installation. John Guest fittings do not require the Figure D. hardware. If your filter has John Guest fittings, disregard the references to figure D hardware and procedures.
Cut the hose to the desired length between the saddle valve and the head. Leave enough slack to be able to secure the hose out of the way.
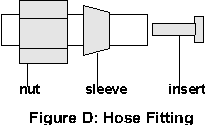
Install the nut, insert and sleeve as shown in Fig D and secure to the saddle valve or faucet.
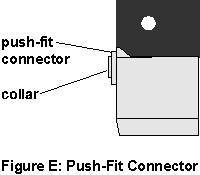
Note: The hose may be easily removed from a John Guest fitting by pushing the collar on the push-fit connector all the way in and holding it there while gently pulling back on the hose. Excessive force is not required.
Inspect the cartridge(s) for obvious damage prior to installation.
Go HERE to see the Under Counter Faucet Kit.
An optional " John Guest Push-Fit " connector Ball Valve can be purchased.

If you're stuck, just give us a call. 613-523-7800
Go HERE for Countertop Filter installation instructions
Go HERE for tips on making the hole in the counter for the Faucet
<< Back to Water Purifiers
|