HomeAbout UsNewsLinksContact UsCareers |
Products
Waterless cookware
Water purifiers
Air purifiers
Juice Extractors
Fine china
Crystal stemware
Tableware
Cutlery
Food storage containers

Things to know
Cookware info & FAQ
Facts about water
Facts about air
Juicing facts
Vacuum packing


Amaircare 6000V Filter Change Instructions

Please read and follow the directions below to replace any filter(s) on your Amaircare HEPA Air Filtration System.

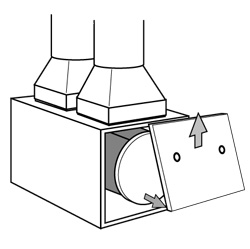
Opening the cabinet

1. Unplug your unit from the power supply outlet.

2. Open the front door of the unit by pushing up and lifting outwards, to gain access to the filter compartment.
(you may need to remove a safety screw from the top of the door first)

amaircare filter change
Hepa

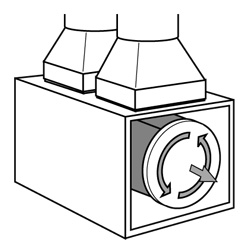
Removing the HEPA Cartridge

1. Turn HEPA filter counter-clockwise and lift out.

2. Remove the HEPA cartridge from the unit. NOTE: The sponge (or carbon) pre-filter and the HEPA filter will contain contaminant's. Remove them slowly from the unit in order to avoid dusting.

Replacing the Foam Pre-Filter

1. Gently pull the foam pre-filter upwards to remove it from the assembly.

2. To replace with a new or washed* pre-filter, carefully spread the foam filter around the outer edges of the filter assembly and gently pull it down to it's original position (covering the exposed steel mesh)

* In order to increase filter life, foam pre-filters may be hand washed, allowed to dry, and re-used. Over time and increased washings the filter will eventually need to be replaced.

Hepa Cartridge Replacement

1. Remove and carefully discard the old HEPA Cartridge. (Filter Assembly)

2. Install the new HEPA Cartridge. (Filter Assembly) see: ‘Re-Assembling the Unit'

Replacing the Inner Blanket

Caution: When completing the following steps, please use extreme care not to inflict pressure on the underlying HEPA filter when replacing the Inner Blanket

1. Look inside the Filter Assembly to locate an end of the Inner Blanket.

2. Without applying pressure directly on the HEPA filter located behind the Inner Blanket, fold the ends of the old Inner Blanket in and remove it from the unit.

3. Insert the new Inner Blanket inside the HEPA Cartridge with the edges overlapped by at least one inch. Once it is in position gently spread the Inner Blanket against the HEPA filter until the two ends of the blanket meet.

Re-Assembling the Unit

1. Place the foam ‘O'-ring into the unit, and place it around the filter collar right in front of the Motor Assembly (if a new foam ‘O'-ring is available, use it in place of the old one)

2. Place the Filter Assembly into the unit, onto the Motor Assembly and firmly twist the Filter Assembly clockwise until the filter is locked tight.

3. Replace the front door by sliding it into place top end first, then lift up and in to align the door into position in it's track, then let it slide down into it's fully closed position.
Replace safety screw if one was removed while opening the unit.

4. Plug the unit back in, and turn it on.

  Copyright @ 2005, BelKraft.com
Service site for BelKraft International - BelKraft Canada - Carico All Rights Reserved